前情提要
CydiaSubstrate,作者为 Jay Freeman(saurik),在iOS7越狱之前名为 MobileSubstrate,因此 CydiaSubstrate 框架中的大部分函数仍以 MS 为前缀。
在用 theos 开发中,control 文件中的 depend 字段依赖库为 mobilesubstrate,该工具是实现 CydiaSubstrate 注入的关键所在,整个工具主要分为 MobileHooker、MobileLoader 以及 Safe mode 三部分。
MobileHooker,是 CydiaSubstrate 的一个组件,对 C 和 Objective-C 均有效。
MobileHooker 组件主要提供了 MSHookMessageEx 和 MSHookFunction 两个函数针对不同语言的 inline hook 功能,其中 MSHookMessageEx 负责用来 hook Objective-C 函数,MSHookFunction 负责用来 hook C/C++ 函数。
————简书作者:HWenj《iOS HOOK》
源码编译
CydiaSubstrate 源代码现在已经不开源了,我调试用的代码是 iOS5 的时候的版本,GitHub。虽然已经过时很久,仅支持32位的移动端,以及32/64位的 PC 端,但其中还是有很多东西值得学习。
正如前文所说,MSHookMessageEx 是针对 OC 函数的 hook,因此它也是采用的 Method Swizzling 方法(详见我之前的文章 Hook 原理之 Method Swizzling),下面我们来分析一下老版本中的源代码。核心代码在 C++ 文件 ObjectiveC.cpp 中。
- 首先需要在你的工程中引入以下几个文件:ARM.hpp、x86.hpp、CydiaSubstrate.h、Debug.hpp、Debug.cpp 以及 Log.hpp,后面三个文件可以不导入,修改几处 Log 的代码即可。
- 然后在工程中添加一对新的 C++ 文件(即实现文件和头文件),我的命名为 MyMSHookMessageEx。
- 然后将 ObjectiveC.cpp 中的内容,包括引入的头文件,
static Method MSFindMethod(Class _class, SEL sel)函数,static void MSHookMessageInternal(...)函数和_extern void MSHookMessageEx(...)函数拷贝到 MyMSHookMessageEx.cpp 中。 - 新建 Cocoa Touch Class,我的命名为
MySwizzling。在头文件中添加函数声明- (void)exchange;。 - 在实现文件 MySwizzling.m 中添加以下代码:
1 |
|
6. 最后在你想测试的地方,初始化类,调用方法即可。(我是在 ViewController.m: -(void)viewDidLoad 中调用的)
源码解析
MSHookMessageEx
MSHookMessageEx 函数就是对 MSHookMessageInternal 函数的封装,除了 prefix 参数为 NULL 之外,其余的参数都原封不动的传入。
MSHookMessageInternal
先厘清一下这个核心函数的整个流程。
- 进入 MSHookMessageInternal 函数先是一大堆参数检查的 log, 比较清晰,就不分析了。然后调用
Method method(MSFindMethod(_class, sel));通过 MSFindMethod 函数获取 sel 对应的方法 method; - 初始化一些值。字符指针 type 赋值为 method 的参数类型等描述。direct 赋值为 false,这个值代表着传入的参数 sel 是否为传入的参数 _class 中的方法,即是否为本类的方法。在接下来的第一个 for 循环中改变 direct 的值,这个循环就是用来判断 sel 是否是 _class 中的方法。如果不是本类的方法,执行第3步。如果是本类的方法,就跳过 if 函数,执行第4步。
- 如果不是本类的方法,就根据运行设备的架构(32位的arm,i386 和 x86_64)添加
class_getMethodImplementation(super,sel)以及执行 sel 对应的函数实现的机器码,将返回值存储在 old 中。然后执行第5步。 - 如果是本类的方法,就跳过 if 函数,将找到的 sel 对应的方法 method 的实现 imp 赋给 old。然后执行第5步。
- 然后将 old 的值赋给 *result,即 oldConnect 函数指针。
- 如果 prefix != NULL,就给 _class 类添加一个 sel 为 prefix+sel,imp 为 old 的方法。
- 如果是本类的方法,执行第8步。如果不是,执行 else 分支,第9步。
- direct = true,就通过
method_setImplementation函数将传入的 newConnect 的函数地址赋给 sel 对应的方法 method 中的实现。即调用 connect_orig,会跳到 newConnect 的入口函数处。 - direct = false,则通过
class_addMethod函数将函数名为 sel,函数地址为 newConnect 函数地址,函数类型为 type 的方法添加到 _class 类中。
下面对主要部分作详细解释。
MSFindMethod
MSFindMethod 函数主要是用于找到传入的参数 sel 对应的 method。
1 | static Method MSFindMethod(Class _class, SEL sel) { |
主要是通过两个 for 循环,遍历参数 _class 及其父类(父类的父类…直到基类),通过函数 class_copyMethodList 取得 _class 的方法列表,通过第二个 for 循环来遍历方法列表,与 sel 字符串作比较,如果匹配成功,即找到 sel 对应的方法,返回该 method,否则一直遍历,直到最后返回 nil。
这份源代码中,作者在使用 C++ 语言的初始化时,多用括号。如 int j = 0; 作者常使用 int j(0);
if (!direct)
1 | if (!direct) { |
前两句代码比较容易理解,给 length 分配大小,然后给 buffer 分配内存,以4个字节为单位分配11个可读写的内存。然后将 super 赋值为 _class 的父类。
接下来这一部分涉及到汇编和机器码的对应问题,后面的讲解主要以32位的 arm 为例,i386 和 x86_64 都跟它差不多,比它要更简单一点。
推荐官方手册:ARM Architecture Reference Manual。非常详细和权威的参考资料。
汇编语言对应着不同的机器语言指令集。一种汇编语言专用于某种计算机系统结构,而不像高级语言,可以在不同系统平台间移植。CPU 处理的时候实际上是处理的机器语言,也就是我们常说的机器码。由汇编器负责汇编语言到机器语言的转换。

上图为与汇编语言相对应的通用的机器码格式。cond 为条件码,如 EQ(EQual to 0)、NE(Not Equal to 0)、CS(Carry Set)等等,如果是无条件,则为 AL(ALways),对应的机器码为1110。
26~27位是保留位。
I 位,也就是第25位,是用来表明 shifter_operand 段存放的类型。0表示寄存器,1表示立即数。
24~21位是 opcode,表明指令的类型。如 AND 为0000,SUB 为0010,MOV 为1101等等。
S 位,第20位,表明是否影响 cpsr(程序状态寄存器),有则置1,否则置0。
19~16位是指 Rn 寄存器,也就是第一个源操作数寄存器,根据每个指令的格式,有的指令有 Rn,有的没有。
15~12位是指 Rd 寄存器,即目的寄存器,存放操作后的数据。
11~0位标明第二个源操作数,若为立即数则填该立即数的二进制值,若为通用寄存器则填通用寄存器标号的二进制值。另外根据不同的指令,这一字段会有不同的具体划分,可查阅官方手册。
根据 ARM.hpp 头文件中的宏定义,来具体分析这几句汇编代码。以第一句A$stmdb_sp$_$rs$(...) 为例,在头文件中的定义为:
1 | enum A$r { |
0xe920000 的二进制数为1110 10 0 1001 0 000000000000,即无条件,操作指令为1001,019的字段通过按位或来填充。首先 A$sp 左移16位,A$sp = A$r13 = 13 = 1101,左移16位,即填充至1916位,Rn 寄存器的位置,0~15的字段由 rs 填充。
第一句 buffer[ 0] = A$stmdb_sp$_$rs$((1 << A$r0) | (1 << A$r1) | (1 << A$r2) | (1 << A$r3) | (1 << A$lr)); 即1左移0位,1左移1位,1左移2位,1左移3位,1左移14位,按位或之后为:1110 10 0 1001 0 1101 0100 0000 0000 1111。官方手册上关于 stmdb 的格式是这样的:

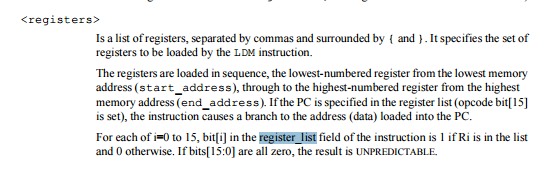
其中 registers 的解释为:

上面的代码执行后,在第0、1、2、3、14位均为1,也就是代表了 r0、r1、r2、r3、lr 寄存器。因此我们将机器码整理为汇编语言,即为 stmdb sp! {r0~r3,lr}。
将后面的几句依次整理为汇编语言:

即为
1 | stmdb sp! {r0~r3, lr} |
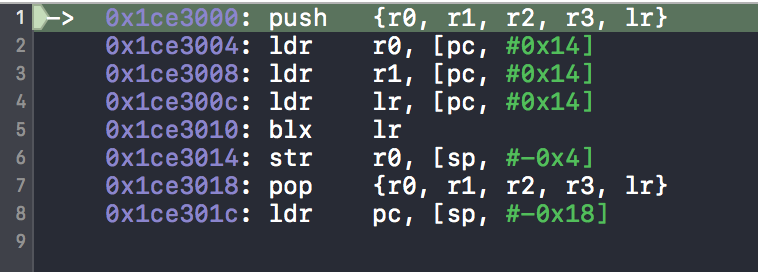
我们在 newConnect 函数的末尾 return oldConnect(self, _cmd) 处下一个断点,然后在控制台输入几次 si 命令,即可看到增加的这几行汇编代码与我们分析的一样,如下图:

那么这几行汇编代码是什么意思呢?
第1行,是将 r0~r3,以及 lr 寄存器推入栈中,即保存现在的状态。
第2、3、4行,将 pc+0x14 处的数值存入 r0、r1、lr 寄存器。这几行汇编指令都是以机器码的形式写入 buffer 中的,buffer[0]~buffer[7] 保存了这8条指令。buffer[ 8] = reinterpret_cast<uint32_t>(super); 即保存的是 super (_class 父类)的值,buffer[9] 保存的是 sel 的值,buffer[10] 保存的是 class_getMethodImplementation 的地址。
有关 pc 的计算。
PC 值(program counter)表示下一条指令存储的地址。由于 ARM 采用流水线来提高 CPU 利用效率,无论是 ARM7 的3级流水线还是 ARM9 的5级流水线,如果当前指令在执行,那么下一条指令一定正在译码,再下一条指令正在读取。
因此 PC 值实际上指的是当前执行指令的下一条的再一下条指令。
第5行,跳到 lr 寄存器中的地址处,执行指令代码,即 buffer[10],class_getMethodImplementation 函数,它的参数为 r0,r1。那么,也就是执行 class_getMethodImplementation(super, sel);
第6行,lr 寄存器存储的地址中的代码执行完毕后,将返回值 r0 寄存器中的值保存到栈中,即 sp-0x4 中,然后 sp = sp -0x4。也就是说在栈中保存了 sel 对应的 imp 值。
第7行,将 r0~r3,以及 lr 寄存器推出栈,恢复之前的状态。
第8行,将 pc 指向 sp-0x18 处的值。因为第7行指令执行完之后,sp 的值也恢复到第1条指令执行之前的状态,所以需要 sp-0x18 来找到再第6条指令处保存的返回值,并执行。(有关 ARM 中栈以及 SP 的操作,可以参考我之前的文章 栈·参数存储排布)
因此整个汇编代码做的事情实际上就是前面在流程中提到的,根据运行设备的架构(32位的arm,i386 和 x86_64)来执行方法调用class_getMethodImplementation(super,sel),以及执行这个方法返回的 imp。
class_getMethodImplementation 函数内部会调用 lookUpImpOrNil 函数,这个函数接着又会调用
lookUpImpOrForward函数。
而 lookUpImpOrForward 正是 objc_msgSend 消息函数在没有缓存的时候,将会执行的函数。因此 class_getMethodImplementation 函数寻找对应的 imp 的流程跟无 cache 发送消息的流程是一样的,会往上寻找父类的方法列表,一直到基类的方法列表,找不到再进行消息转发等等。(具体内容可以参考我之前的文章 通过汇编解读 objc_msgSend)
最后是将 buffer 的地址赋给 old,这样,在执行 connect_orig 时,就会跳到 buffer[0] 处执行那几条机器码,找到 sel 对应的 imp 并执行。
为什么要使用 if (!direct) 这段代码
在 MSHookMessageEx 的官方介绍页面有这样几段话:
However, while these APIs function quite well when there are only a small number of people making modifications, they fail to satisfy more complex use cases; in particular, there are ordering problems if multiple people attempt to hook the same message at different points in an inheritance hierarchy.
Finally, it is important that classes that are being instrumented are not “initialized” as they are being modified (which would both change the ordering of the target program, as well as make it impossible to hook the initialization sequence); over time, the way Objective-C runtime APIs implement this has changed.
Substrate solves all of these problems by providing a replacement API that takes all of these issues into account, always making certain that the classes are not initialized and that the right “next implementation” is used while walking back up an inheritance hierarchy.
作者讲得非常清楚。这一部分将机器码嵌入到原始方法的 IMP 之前,使得在调用自定义方法之后,调用原始方法之前,有一个 old = class_getMethodImplementation(super, sel) 的动作,也就是说,是在执行方法的时候动态查找原始 IMP 的函数,而不是在 MSHookMessageEx 函数执行的时候,就已经确定好了原始 IMP 的地址。
这样做是为了解决在一个继承体系中的不同节点处,hook 相同函数的问题。
现在让我们设想一个情景:有三个类,Parent、Child、Grandson,其中 Grandson 类继承于 Child 类,Child 类继承于 Parent 类。
在 Parent 类中实现了一个函数: - (void)parent_connect。
在 Child 类、Grandson 类中声明这个函数但并没有实现。
在 Child 类以及 Grandson 类中均使用 MSHookMessageEx 函数 hook 了 - (void)parent_connect 函数。
情景1:
- 先调用 Child 类中的 hook 函数,
- 再调用 Grandson 类中的 hook 函数。
情景2:
- 先调用 Grandson 类中的 hook 函数,
- 再调用 Child 类中的 hook 函数,
- 最后再调用一次 Grandson 类中的 hook 函数。
1)如果没有这段嵌入的代码,即注释掉 if (!direct){…} 这段代码。
在情景1中,
- 依次调用Child 类中的自定义函数、 Parent 类中的原始函数,
- 依次调用 Grandson 类中的自定义函数、 Child 类中的自定义函数、 Parent 类中的原始函数。
在情景2中,
- 依次调用 Grandson 类中的自定义函数、 Parent 类中的原始函数,
- 依次调用 Child 类中的自定义函数、 Parent 类中的原始函数,
- 仍是依次调用 Grandson 类中的自定义函数、 Parent 类中的原始函数。
也就是说,Grandson 类中的 - (void)parent_connect 函数的执行顺序在调用 hook 函数时就已经确定了,并不会因为情景2中的第2步 Child 函数的 hook 使得调用顺序改变。
2)如果有这段嵌入代码,
情景1执行状态相同。
情景2则为,
- 依次调用 Grandson 类中的自定义函数、 Parent 类中的原始函数,
- 依次调用 Child 类中的自定义函数、 Parent 类中的原始函数,
- 依次调用 Grandson 类中的自定义函数、 Child 类中的自定义函数、 Parent 类中的原始函数。
Grandson 类中的 - (void)parent_connect 函数的执行顺序是在该函数调用时才会通过嵌入的那段机器码去查找原始方法的实现。这样做维护了原来的继承体系,这也是 OC runtime 的体现。
if (prefix!=NULL)
这一部分比起上一部分来说就简单多了。
1 | if (prefix != NULL) { |
总体来说,就是给传入的参数 sel 字符串加上前缀 prefix,然后将 old 作为 prefix+sel 的实现,type 作为它的函数类型,将这个 method 加入 _class 的方法列表。
比如 prefix = “xxx”,sel = @selector(connect_orig)。执行了这段代码之后,只需要在头文件中声明 - (void)xxxconnect_orig; 不用在 .m 文件中实现,直接调用 [self xxxconnect_orig]; 就会执行原来的 connect_orig 代码。
总结
关于 if (!direct) 这个分支,总的来说就是:
- 如果 direct == true,这个 sel 是本类的方法,就执行
old = method_getImplementation(method);
method_setImplementation(method, imp); - 如果 direct == false,不是本类的方法,就把
old = class_getMethodImplementation(super, sel) 这个函数通过机器码嵌入到调用原函数之前,使得在调用自定义方法后,动态查询原始 IMP 指针;
最后通过 class_addMethod(_class, sel, imp, type) 加入到本类的方法列表中;
执行 class_addMethod 这个方法,主要是为了避免使用 method_setImplementation 覆盖父类已有的函数,所以在本类中动态添加了这个方法。
另外,在 objc/runtime.h 中提到:
@note class_getMethodImplementation may be faster than
method_getImplementation(class_getInstanceMethod(cls, name)).
Reference
[1] ARM机器码分析 http://www.mamicode.com/info-detail-893760.html
[2] 3.Arm机器码 http://www.cnblogs.com/FORFISH/p/4199600.html
[3] C++标准转换运算符reinterpret_cast
http://www.cnblogs.com/ider/archive/2011/07/30/cpp_cast_operator_part3.html