0%

Objective-C 中的类结构

引子

我们已知,OC 中的类也是对象,且对象和类实际上是以结构体的形式存在的(可通过 clang 转换)。在 OC 运行时可以修改对象的方法和属性。那么,这些结论背后的机理是什么呢?

在这篇文章中,我将从类的内存布局以及内存结构方面入手,通过调试 objc runtime 的源代码来厘清上述问题(源代码版本为 objc4-706)。

isa_t 结构体

首先来认识一下 isa 指针,isa 的意思是 it is a object,这是一个对象。对象是由 objc_object 结构体定义的,类是由 objc_calss 结构体定义的,我们可以在 runtime 源码中查看它们的定义:

1
2
3
4
5
6
7
8
9
10
11
struct objc_object {
private:
isa_t isa;
}

struct objc_class : objc_object {
// Class ISA;
Class superclass;    // 父类
cache_t cache;      // formerly cache pointer and vtable
class_data_bits_t bits; // class_rw_t * plus custom rr/alloc flags
}

isa 定义

我们可以看到,对象的结构体中其实就只包含了一个 isa_t 联合类型的成员,类的结构体继承于对象的结构体,因此类的结构体的第一个成员也是 isa_t 联合类型,从这一点来讲,类也是对象。

1
2
3
4
5
6
7
8
9
10
11
12
13
14
15
16
17
18
19
20
21
22
23
24
25
26
27
28
29
30
31
32
33
34
35
36
37
38
39
40
41
42
43
44
45
46
47
48
49
50
51
52
53
54
55
56
57
58
union isa_t 
{
isa_t() { }
isa_t(uintptr_t value) : bits(value) { }

Class cls;
uintptr_t bits;

#if SUPPORT_PACKED_ISA

// extra_rc must be the MSB-most field (so it matches carry/overflow flags)
// nonpointer must be the LSB (fixme or get rid of it)
// shiftcls must occupy the same bits that a real class pointer would
// bits + RC_ONE is equivalent to extra_rc + 1
// RC_HALF is the high bit of extra_rc (i.e. half of its range)

// future expansion:
// uintptr_t fast_rr : 1; // no r/r overrides
// uintptr_t lock : 2; // lock for atomic property, @synch
// uintptr_t extraBytes : 1; // allocated with extra bytes

# if __arm64__
# define ISA_MASK 0x0000000ffffffff8ULL
# define ISA_MAGIC_MASK 0x000003f000000001ULL
# define ISA_MAGIC_VALUE 0x000001a000000001ULL
struct {
uintptr_t nonpointer : 1;
uintptr_t has_assoc : 1;
uintptr_t has_cxx_dtor : 1;
uintptr_t shiftcls : 33; // MACH_VM_MAX_ADDRESS 0x1000000000
uintptr_t magic : 6;
uintptr_t weakly_referenced : 1;
uintptr_t deallocating : 1;
uintptr_t has_sidetable_rc : 1;
uintptr_t extra_rc : 19;
# define RC_ONE (1ULL<<45)
# define RC_HALF (1ULL<<18)
};

# elif __x86_64__
# define ISA_MASK 0x00007ffffffffff8ULL
# define ISA_MAGIC_MASK 0x001f800000000001ULL
# define ISA_MAGIC_VALUE 0x001d800000000001ULL
struct {
uintptr_t nonpointer : 1;
uintptr_t has_assoc : 1;
uintptr_t has_cxx_dtor : 1;
uintptr_t shiftcls : 44; // MACH_VM_MAX_ADDRESS 0x7fffffe00000
uintptr_t magic : 6;
uintptr_t weakly_referenced : 1;
uintptr_t deallocating : 1;
uintptr_t has_sidetable_rc : 1;
uintptr_t extra_rc : 8;
# define RC_ONE (1ULL<<56)
# define RC_HALF (1ULL<<7)
};
...
}

关于联合类型,联合表示几个变量公用一个内存位置,在不同的时间保存不同的变量。当一个联合被说明时,编译程序自动地产生一个变量,其长度为联合中最大的变量长度。也就是说没,在任何同一时刻,联合只存放了一个被选中的成员。在 isa_t 联合结构中,共有三个成员,cls,bits,以及结构体变量。

isa 初始化

我们从 isa 的初始化来看 isa_t 联合中结构体各字段的意义。当为 OC 对象分配内存时(比如调用 alloc 方法),会初始化 isa 指针,其方法调用栈如下图所示:
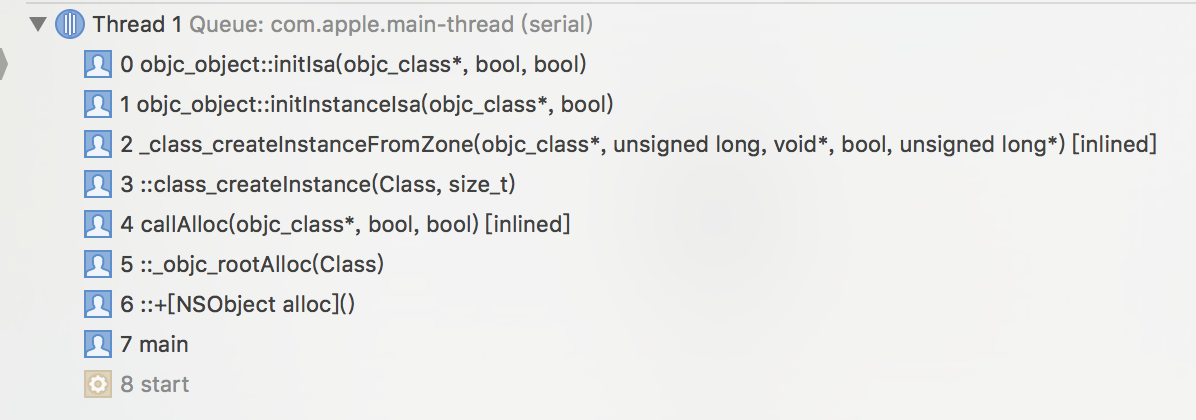
其中 inline void objc_object::initIsa(Class cls, bool nonpointer, bool hasCxxDtor) 方法的定义如下:

1
2
3
4
5
6
7
8
9
10
11
12
13
14
15
16
17
18
19
20
21
22
23
24
25
26
27
28
29
30
31
32
33
34
35
36
37
inline void 
objc_object::initIsa(Class cls, bool nonpointer, bool hasCxxDtor)
{
assert(!isTaggedPointer());

if (!nonpointer) {
isa.cls = cls;
} else {
assert(!DisableNonpointerIsa);
assert(!cls->instancesRequireRawIsa());

isa_t newisa(0);

#if SUPPORT_INDEXED_ISA
assert(cls->classArrayIndex() > 0);
newisa.bits = ISA_INDEX_MAGIC_VALUE;
// isa.magic is part of ISA_MAGIC_VALUE
// isa.nonpointer is part of ISA_MAGIC_VALUE
newisa.has_cxx_dtor = hasCxxDtor;
newisa.indexcls = (uintptr_t)cls->classArrayIndex();
#else
newisa.bits = ISA_MAGIC_VALUE;
// isa.magic is part of ISA_MAGIC_VALUE
// isa.nonpointer is part of ISA_MAGIC_VALUE
newisa.has_cxx_dtor = hasCxxDtor;
newisa.shiftcls = (uintptr_t)cls >> 3;
#endif

// This write must be performed in a single store in some cases
// (for example when realizing a class because other threads
// may simultaneously try to use the class).
// fixme use atomics here to guarantee single-store and to
// guarantee memory order w.r.t. the class index table
// ...but not too atomic because we don't want to hurt instantiation
isa = newisa;
}
}

以 x86_64 架构为例,ISA_MAGIC_VALUE 为 0x001d800000000001,在执行 newisa.bits = ISA_MAGIC_VALUE; 这行代码之后,newisa 的结构如下图:
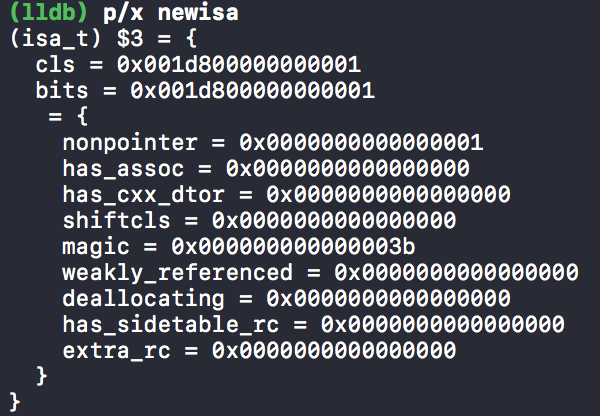
正如注释中提到的,执行这行代码,给 magic 和 nonpointer 赋值,nonpointer 是第0位,为1,magic 是第4752位,为111011。接下来再将传入的 hasCxxDtor 赋值给 newisa.has_cxx_dtor,cls右3位赋值给 newisa.shiftcls。因为 shiftcls 是类或元类的指针,所以肯定是对齐的,也就是以0或8结尾,所以第02位在 isa 指针中就被占用来记录其他信息了(nonpointer、has_assoc、has_cxx_dtor )。

isa 各字段的含义:

  • nonpointer:表示isa_t 的类型,0表示这是一个指向 cls 的指针(iPhone 64位之前的 isa 类型),1表示当前的 isa 并不是普通意义上的指针,而是 isa_t 联合类型,其中包含有 cls 的信息,在 shiftcls 字段中。
  • has_assoc:对象含有或曾经含有关联引用,没有关联引用可以更快释放内存。
  • has_cxx_dtor:表示该对象是否有 C++ 或 ARC 的析构函数,如果没有析构器就会快速释放内存。
  • shiftcls:当前对象对应的类指针,或当前类对应的元类指针。
  • magic:0x3b,用于调试器判断当前对象为真的对象还是未初始化的空间。 (即判断是否完成初始化)
  • weakly_referenced:对象是否指向或曾经指向一个 ARC 的弱变量,没有弱引用的对象可以更快释放。
  • deallocating:对象正在释放内存。
  • has_sidetable_rc:该对象引用计数太大,isa 指针存不下了。
  • extra_rc: 存储引用计数值减一后的值。

isa->shiftcls

通过前面提到的 objc_object 的定义,我们可以看到,对象的结构体中仅仅只有一个 isa 指针,并没有保存对象的属性、方法等。因为如果每一个对象都保存了自己能执行的方法,那么会占用很多的内存。

当实例方法(减号方法)被调用时,是通过对象的 isa 指针来查找对应的类(shiftcls 字段),然后在 objc_class 的 class_data_bits_t 结构体中查找本类方法的实现,superclass 中查找父类方法。

调用实例方法,也就是向对象发送消息。那么调用类方法(加号方法),也是在向类发送消息。正如我们前面提到的,类也是一个对象,类对象的类是它的元类(meta class)。所以类方法存储在元类结构中。

元类当然也是一个对象(为 objc_class 结构),它所属的类是根类(NSObject)的元类,根元类的类就是它自己。总的来说,对象的 isa->shiftcls 指向其所属类,类的 isa->shiftcls 指向元类,元类的 isa->shiftcls 指向根元类,根元类指向它自己。

可以通过 ISA() 来获取 isa->shiftcls:

1
2
3
4
5
6
inline Class 
objc_object::ISA()
{
assert(!isTaggedPointer());
return (Class)(isa.bits & ISA_MASK);
}

即通过 ISA_MASK 掩码获取。

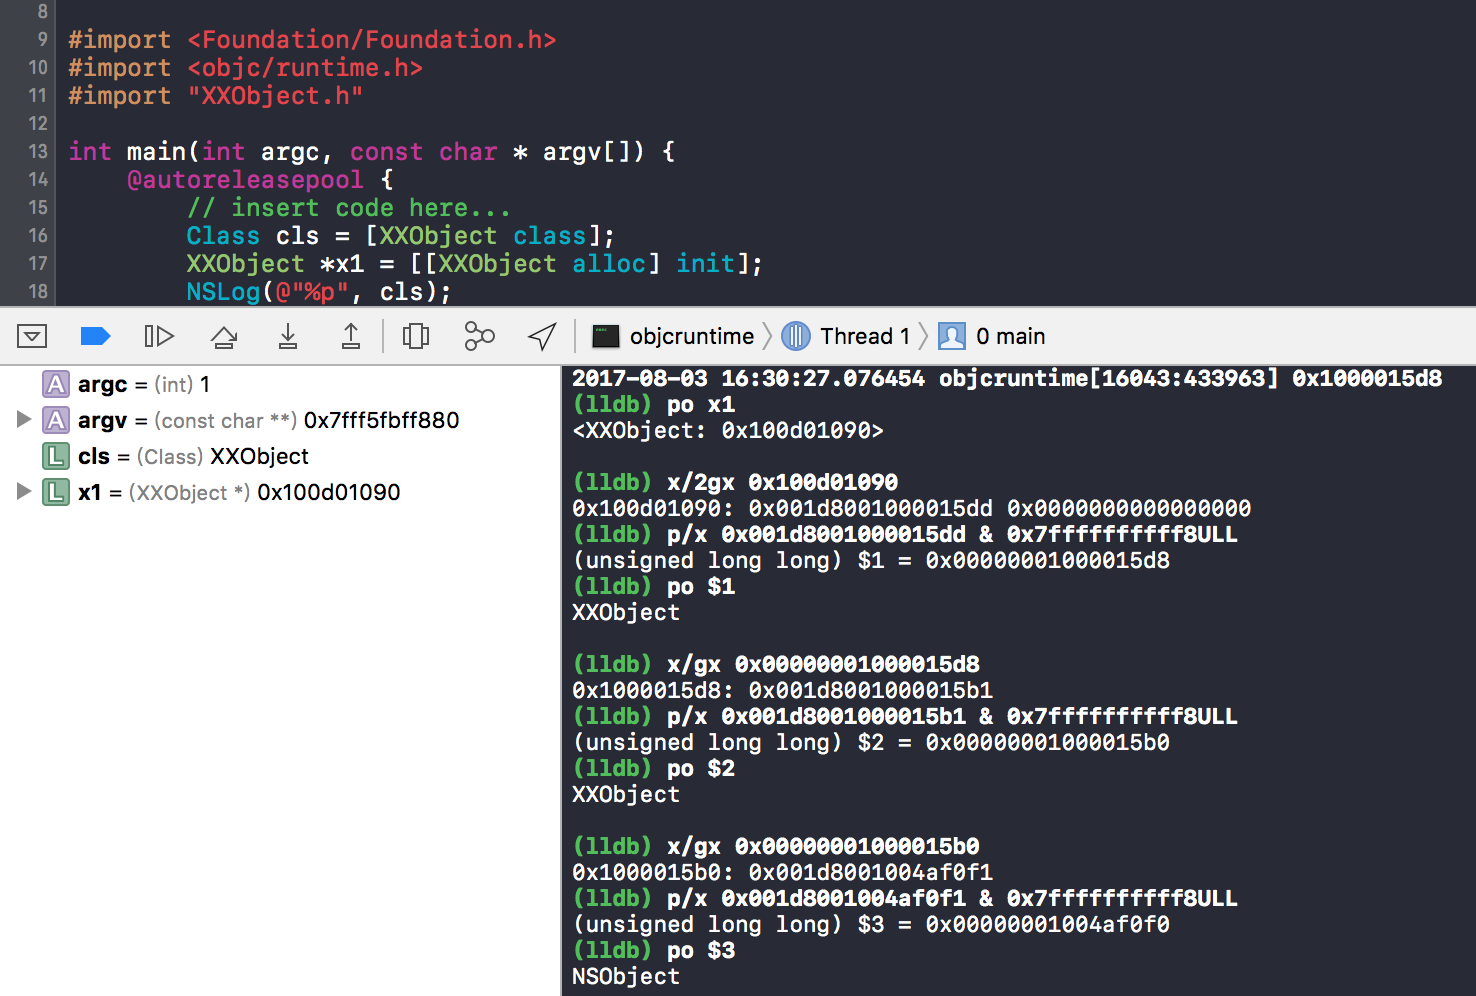
在上图中(x86_64),x1是一个对象,$1是x1的 isa->shiftcls 指向的类,$2是$1的 isa->shiftcls 指向的元类,$3是$2的 isa->shiftcls 指向的根元类。

class_data_bits_t 结构体

Class superclass 是当前类的父类指针,cache_t cache 在我之前的一篇文章“通过汇编解读 objc_msgSend”中有详细讲解。

class_data_bits_t 结构体只包含有一个 uintptr_t 类型的 bits。另外我们可以通过它的 data() 方法,访问64位中的第3~47位,返回一个 class_rw_t* 指针。objc_class 中的 data() 方法仅仅是对它做了一个封装。

1
2
3
4
5
6
7
8
9
10
11
12
13
14
15
16
17
18
19
20
21
22
23
struct class_data_bits_t {

// Values are the FAST_ flags above.
uintptr_t bits;
private:
...
public:
...
class_rw_t* data() {
return (class_rw_t *)(bits & FAST_DATA_MASK);
}
...
}

struct objc_class : objc_object {
...
class_data_bits_t bits; // class_rw_t * plus custom rr/alloc flags
...
class_rw_t *data() {
return bits.data();
}
...
}

在 objc_class 的注释中提到,class_data_bits_t 结构体就是 class_rw_t 指针加上 rr/alloc 标志。

class_rw_t & class_ro_t

1
2
3
4
5
6
7
8
9
10
11
12
13
14
15
16
17
18
19
20
21
struct class_rw_t {
// Be warned that Symbolication knows the layout of this structure.
uint32_t flags;
uint32_t version;

const class_ro_t *ro;

method_array_t methods;
property_array_t properties;
protocol_array_t protocols;

Class firstSubclass;
Class nextSiblingClass;

char *demangledName;

#if SUPPORT_INDEXED_ISA
uint32_t index;
#endif
...
}

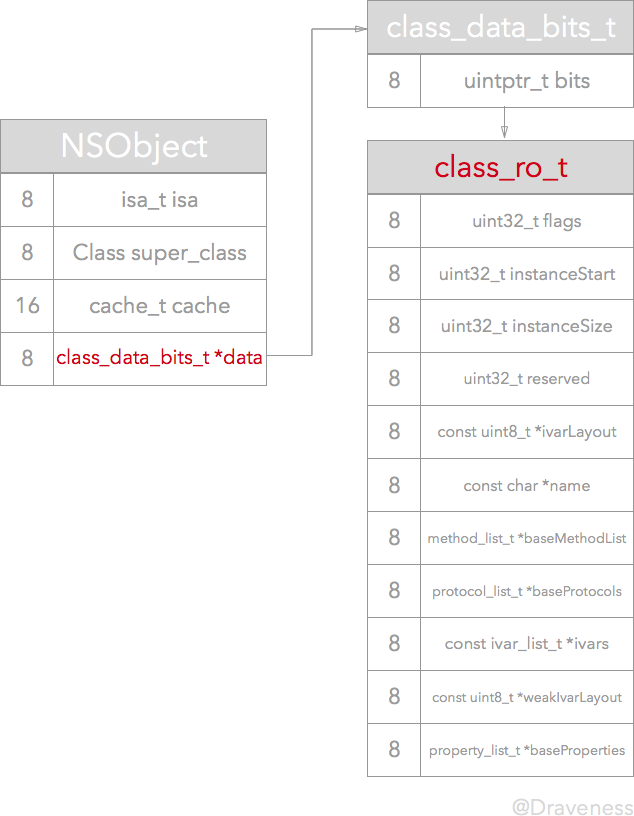
很明显可以看到,类中的方法、属性、协议等都保存在 class_rw_t 结构体中。其中的 class_ro_t 结构体保存的是当前类在编译期间就已经确定的属性、方法以及遵循的协议。

编译期间:
运行后:
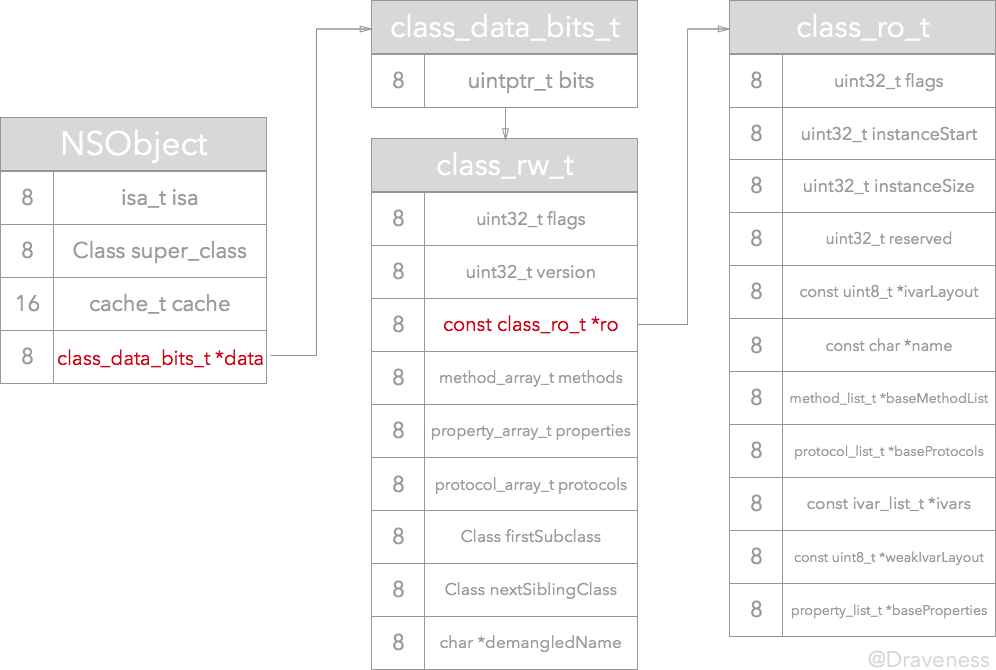
以上两张图来自 Draveness 的博客:深入解析 ObjC 中方法的结构

这个变化来自于,在对类进行初始化的 realezeClass 方法:

1
2
3
4
5
6
7
8
9
10
11
12
13
14
15
16
17
18
19
20
21
static Class realizeClass(Class cls)
{
...
ro = (const class_ro_t *)cls->data();
if (ro->flags & RO_FUTURE) {
// This was a future class. rw data is already allocated.
rw = cls->data();
ro = cls->data()->ro;
cls->changeInfo(RW_REALIZED|RW_REALIZING, RW_FUTURE);
} else {
// Normal class. Allocate writeable class data.
rw = (class_rw_t *)calloc(sizeof(class_rw_t), 1);
rw->ro = ro;
rw->flags = RW_REALIZED|RW_REALIZING;
cls->setData(rw);
}
...
methodizeClass(cls);

return cls;
}

其中 methodizeClass 方法将类自己实现的方法、属性和协议加载到 class_rw_t 的 methods、properties 和 protocols 中。

我们新建一个类:

1
2
3
4
5
6
7
8
9
10
11
12
13
14
15
16
17
18
19
20
21
22
23
24
25
26
27
28
29
30
31
32
33
34
35
36
37
38
39
40
41
42
43
44
45
46
47
48
49
50
//  XXObject.h
#import <Foundation/Foundation.h>

@protocol XXObjectProtocol <NSObject>

- (void)hello;

@end

@interface XXObject : NSObject <XXObjectProtocol>

@property (nonatomic, strong, readwrite) NSString *myproperty;

- (void)hello;

+ (void)myClassMethod;

@end


// XXObject.m
#import "XXObject.h"

@implementation XXObject

- (void)hello {
NSLog(@"Hello");
}

+ (void)myClassMethod {
NSLog(@"myClassMethod");
}

@end


// main.m
#import <Foundation/Foundation.h>
#import <objc/runtime.h>
#import "XXObject.h"

int main(int argc, const char * argv[]) {
@autoreleasepool {
// insert code here...
Class cls = [XXObject class];
XXObject *x1 = [[XXObject alloc] init];
NSLog(@"%p", cls);
}
return 0;
}

XXObject 这个类遵循 XXObjectProtocol 协议,并实现了其中的 hello 方法。定义并实现了类方法 myClassMethod。在 main 函数中初始化这个类的实例,然后运行一次,获取 XXObject 在内存中的地址。我的是0x1000015d8。再在 realizeClass 方法内, rw 还未赋值之前下条件断点,如下图:

然后运行:
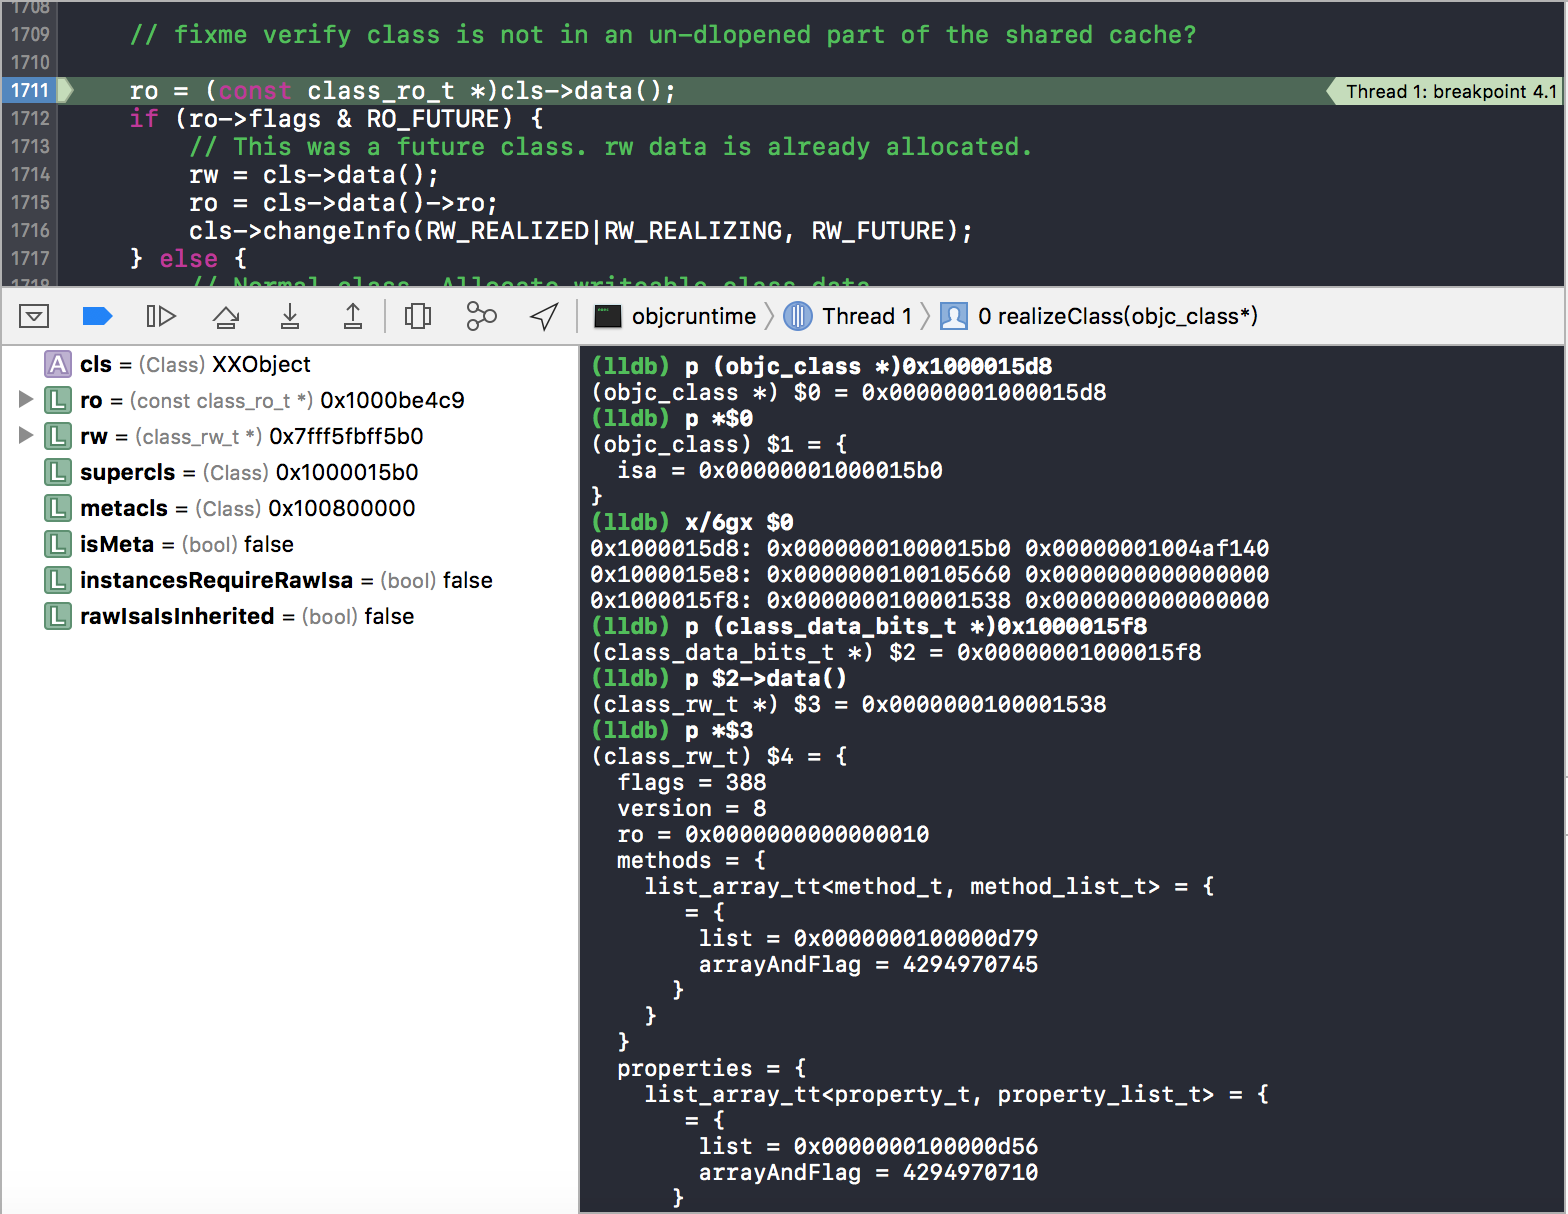
可以看到在断点处打印 bits.data() 返回的是 class_rw_t * 指针,继续打印 class_rw_t 结构体的值,并不对,因为在 realizeClass 方法中的 rw 被赋值前,应该是 class_ro_t 结构体类型,如下图:

接着可以打印 ro 结构体内的方法列表,即编译期间确定的该对象的方法,存储在只读区域,有遵循协议实现的 hello 方法,还有 .cxx_destruct 这个编译器自动生成的方法(用来在 ARC 下释放对象的实例变量),以及属性 myproperty 的 setter、getter 方法。如下图:
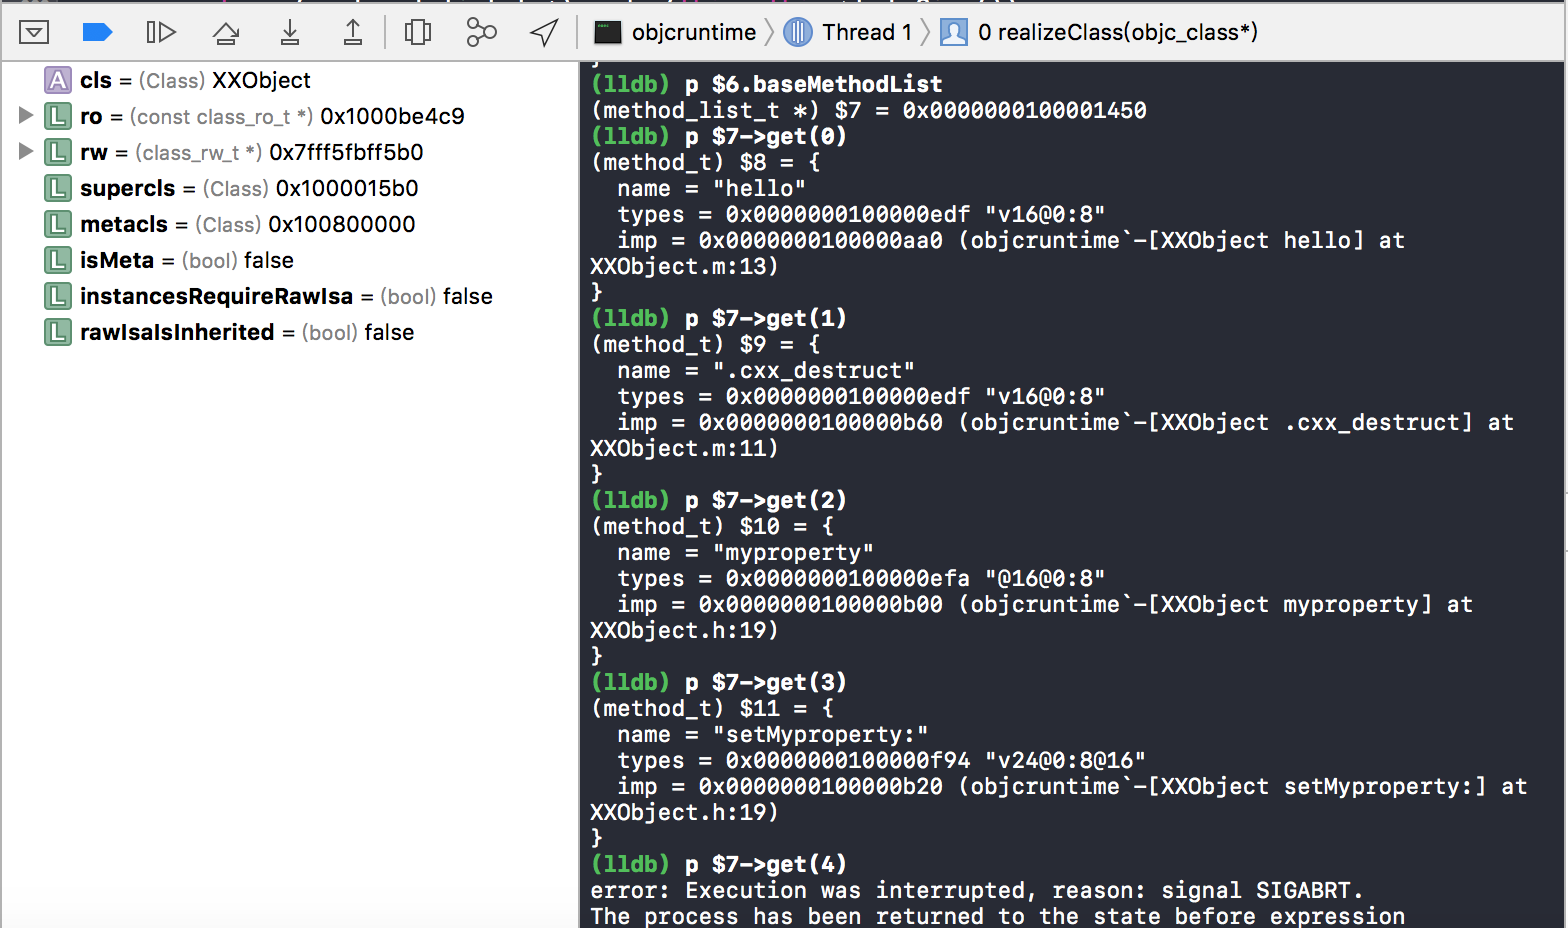
打印 ro 结构体内的属性列表,如下图:
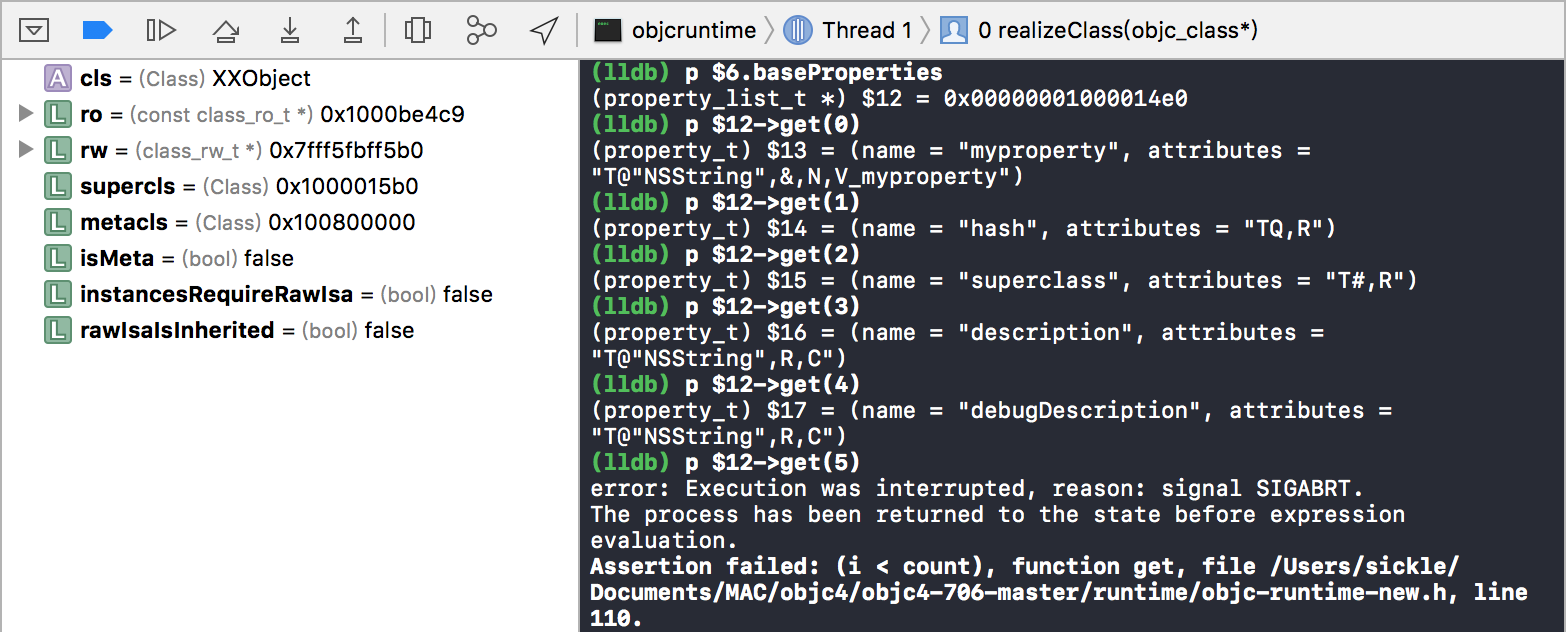
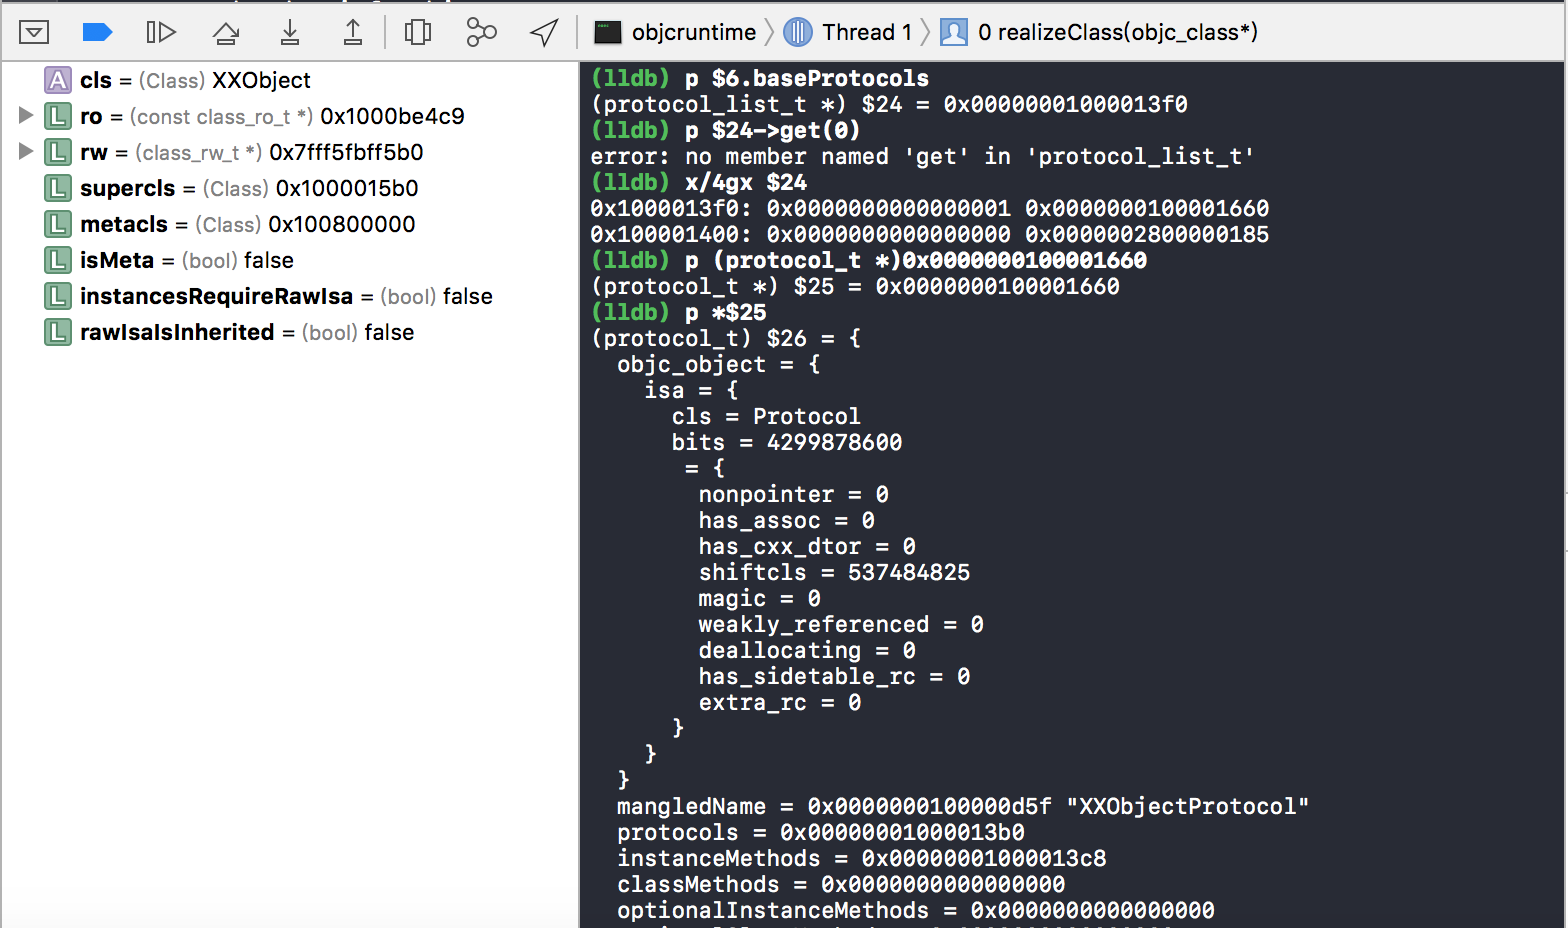
打印协议,protocol_list_t 没有 get 方法,它的结构是这样的:

1
2
3
4
5
6
struct protocol_list_t {
// count is 64-bit by accident.
uintptr_t count;
protocol_ref_t list[0]; // variable-size
...
}

所以第一个64位表示该对象遵循的协议的数量,紧接着是协议列表,如下图:

在运行完对 rw 的赋值之后,再查看 class_data_bits_t * 指针,其指向的内存地址已经改变,从之前的 class_ro_t * 指针 0x100001538 变为真正的 class_rw_t * 指针的地址 0x100802d20。打印发现 class_rw_t 结构体中的 ro 已被设置为 class_ro_t * 指针的地址。如下图:
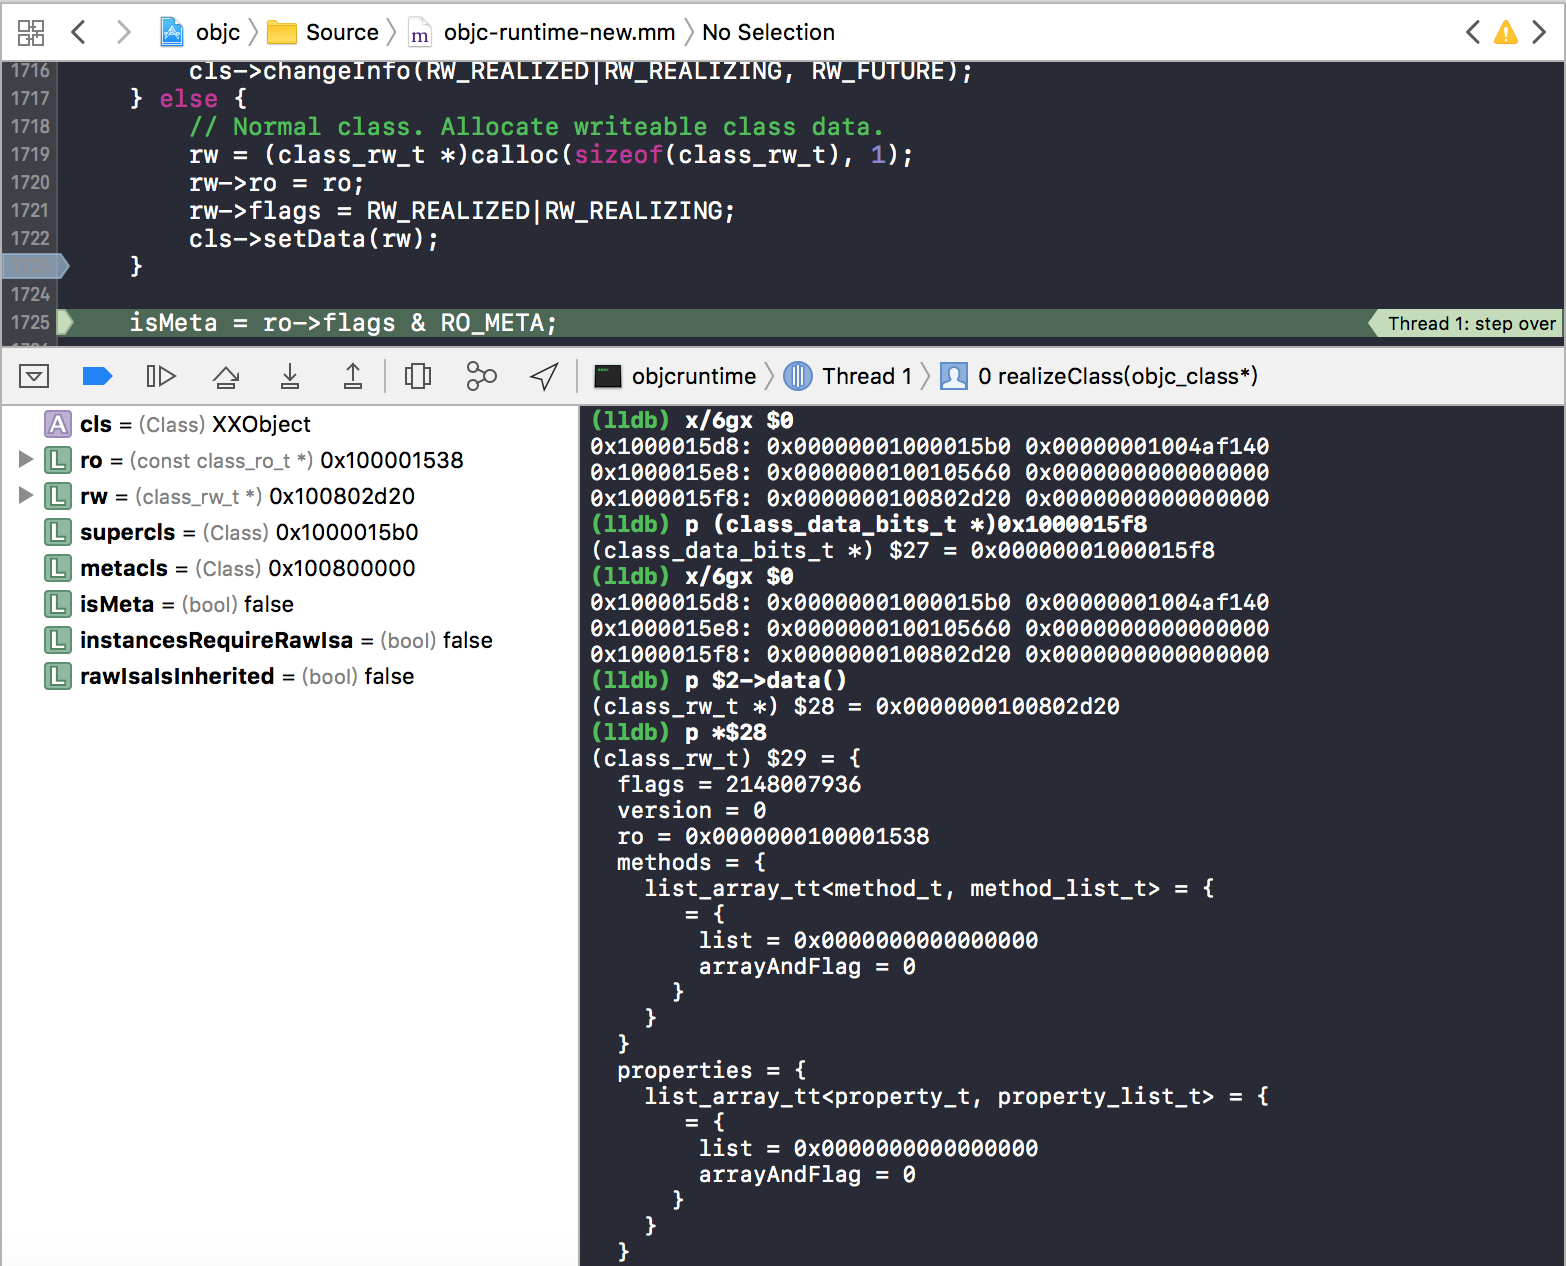
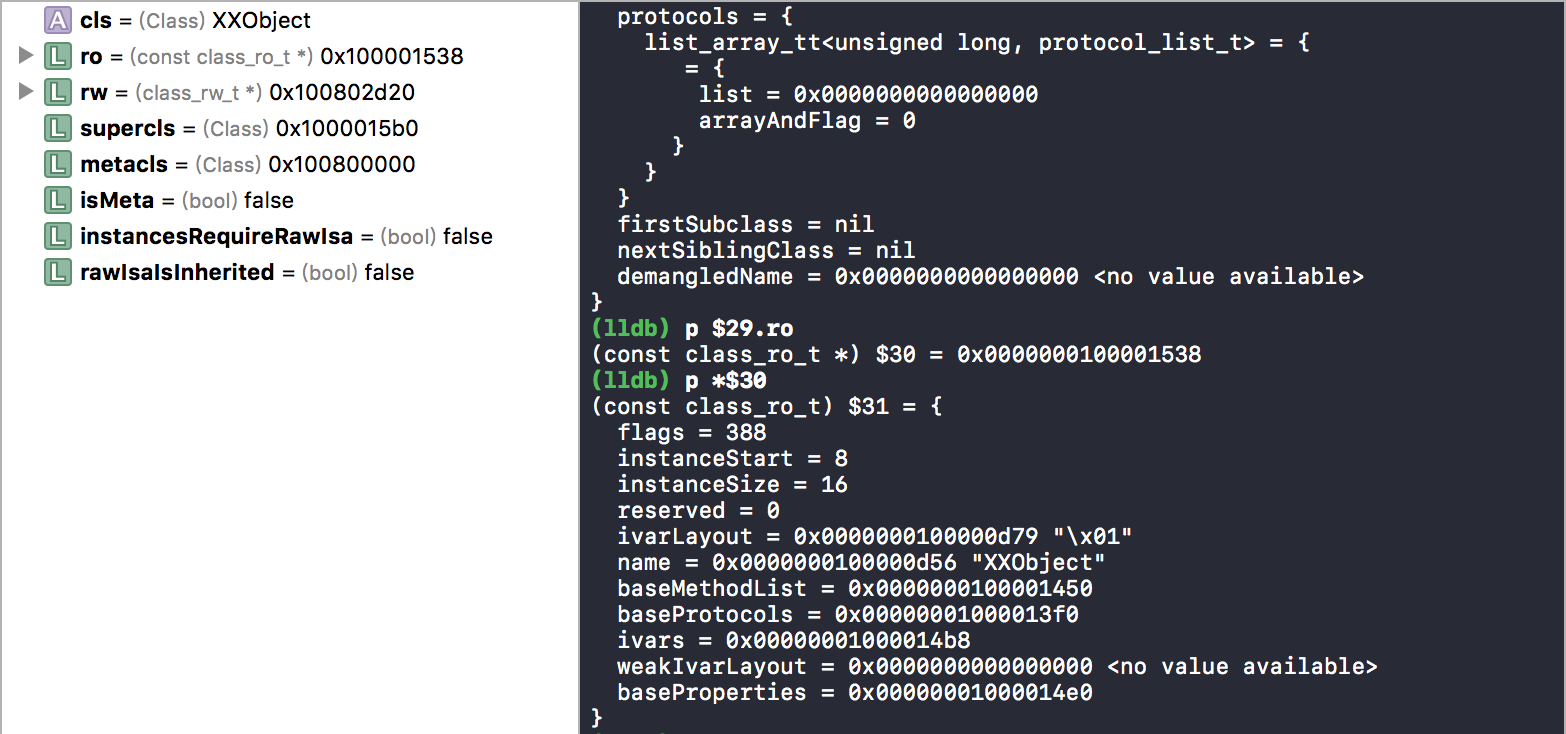
methods、properties等仍为0,在 realizeClass 方法末尾处的 methodizeClass 方法执行完,才会被赋值,且与 ro 中的方法列表等指针地址相同。

动态添加方法

如果动态添加方法的话,又会被存在什么位置呢?我们将 main 函数修改为下面的代码:

1
2
3
4
5
6
7
8
9
10
11
12
13
14
15
int main(int argc, const char * argv[]) {
@autoreleasepool {
Class cls = [XXObject class];
XXObject *x1 = [[XXObject alloc] init];
NSLog(@"%p", cls);

SEL come = sel_registerName("come");

class_addMethod(cls, come, class_getMethodImplementation(cls, @selector(hello)), method_getTypeEncoding(class_getInstanceMethod(cls, @selector(hello))));

[x1 performSelector:come];

}
return 0;
}

[x1 performSelector:come]; 处下断点:

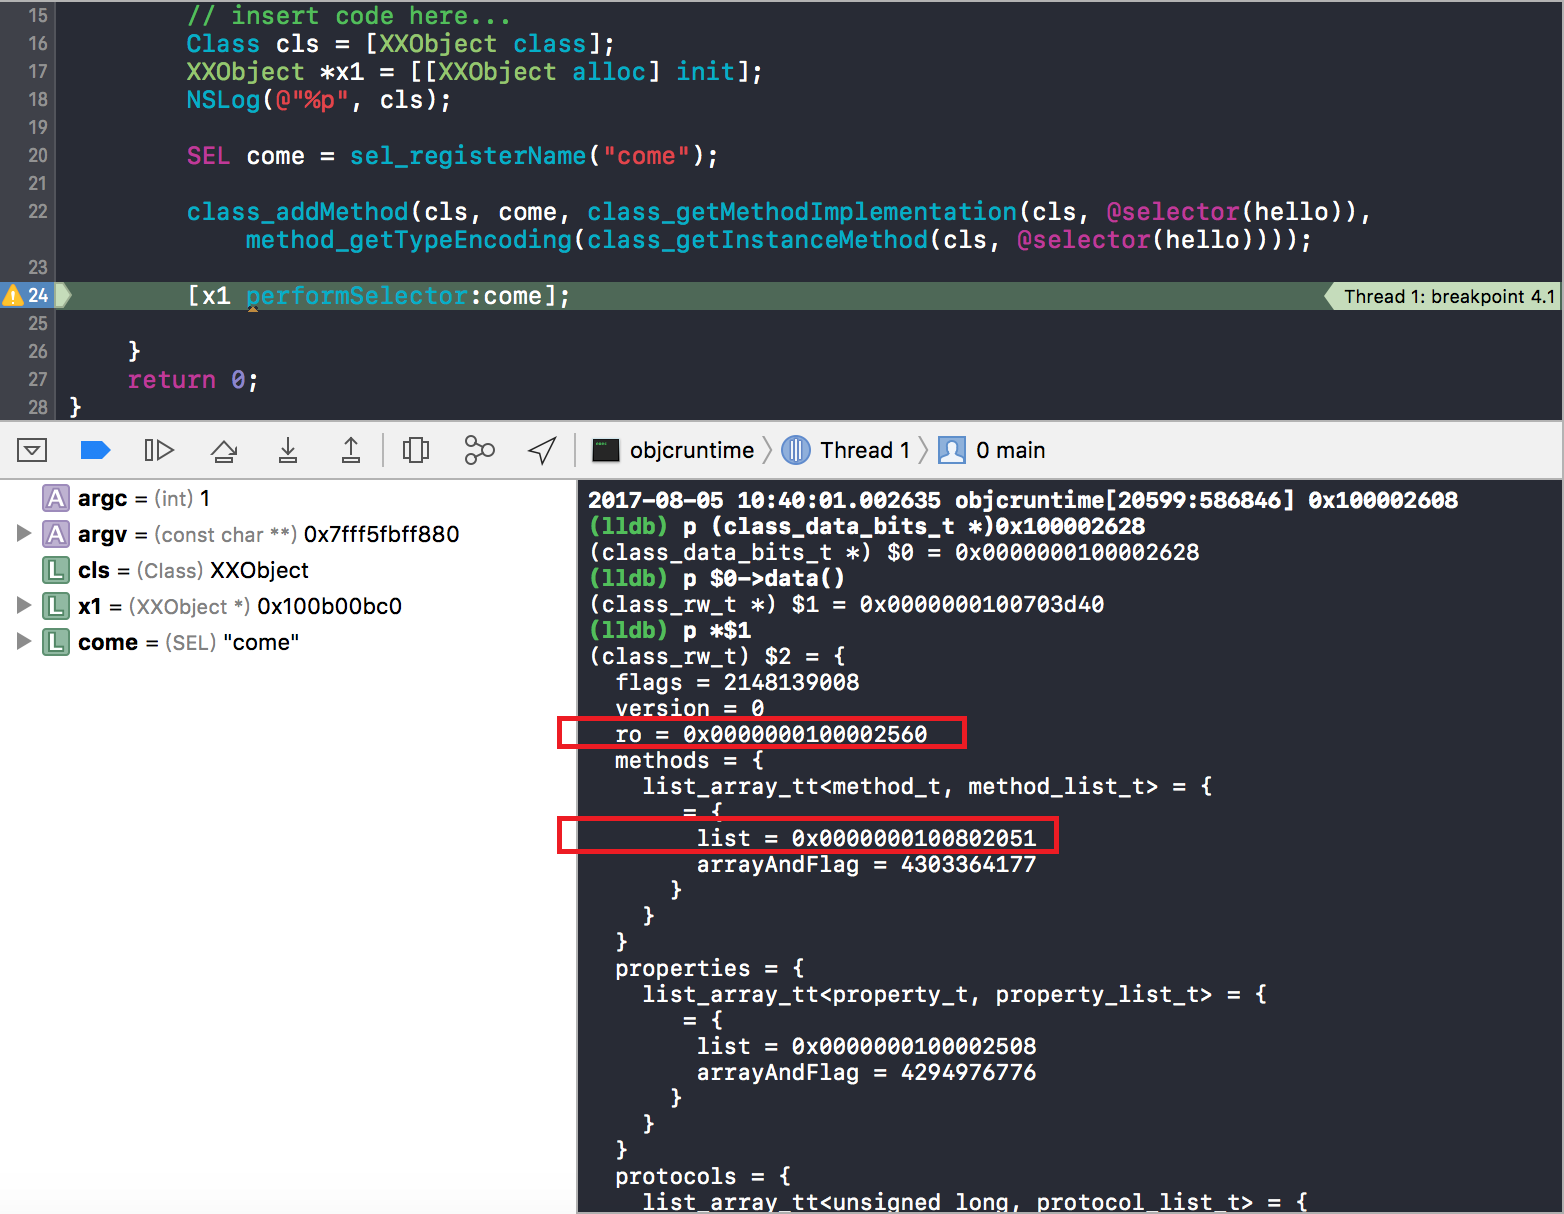
打印 class_rw_t * 指针的地址,可以看到 methods 的指针为 0x100802051,地址末尾为1,标明这是 thumb 架构,打印的时候减1即可。通过 $3 可以看见,直接强制转换为 method_list_t * 指针,并不能打印处方法的地址。我们打印 0x100802050 处的内存,可以看到首先是 0x2,这是标明当前方法列表的数目,0x100802030 即是动态增加的方法列表的指针,0x100002478 是 ro.baseMethodList 的指针:
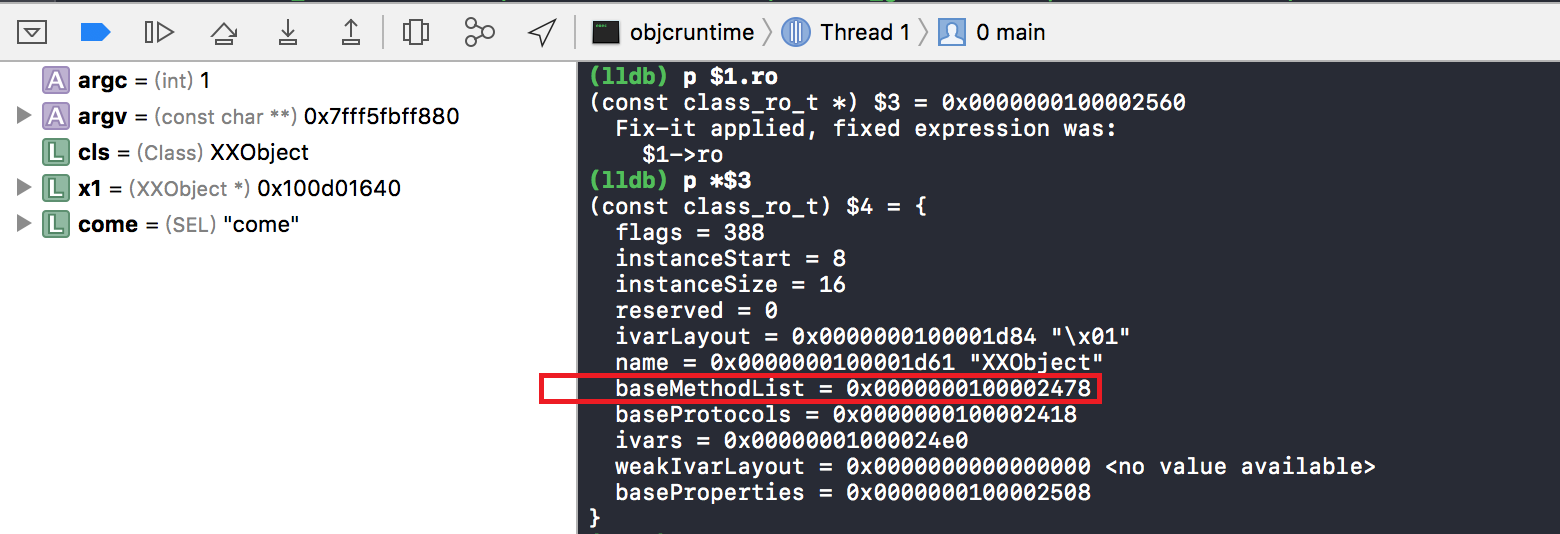
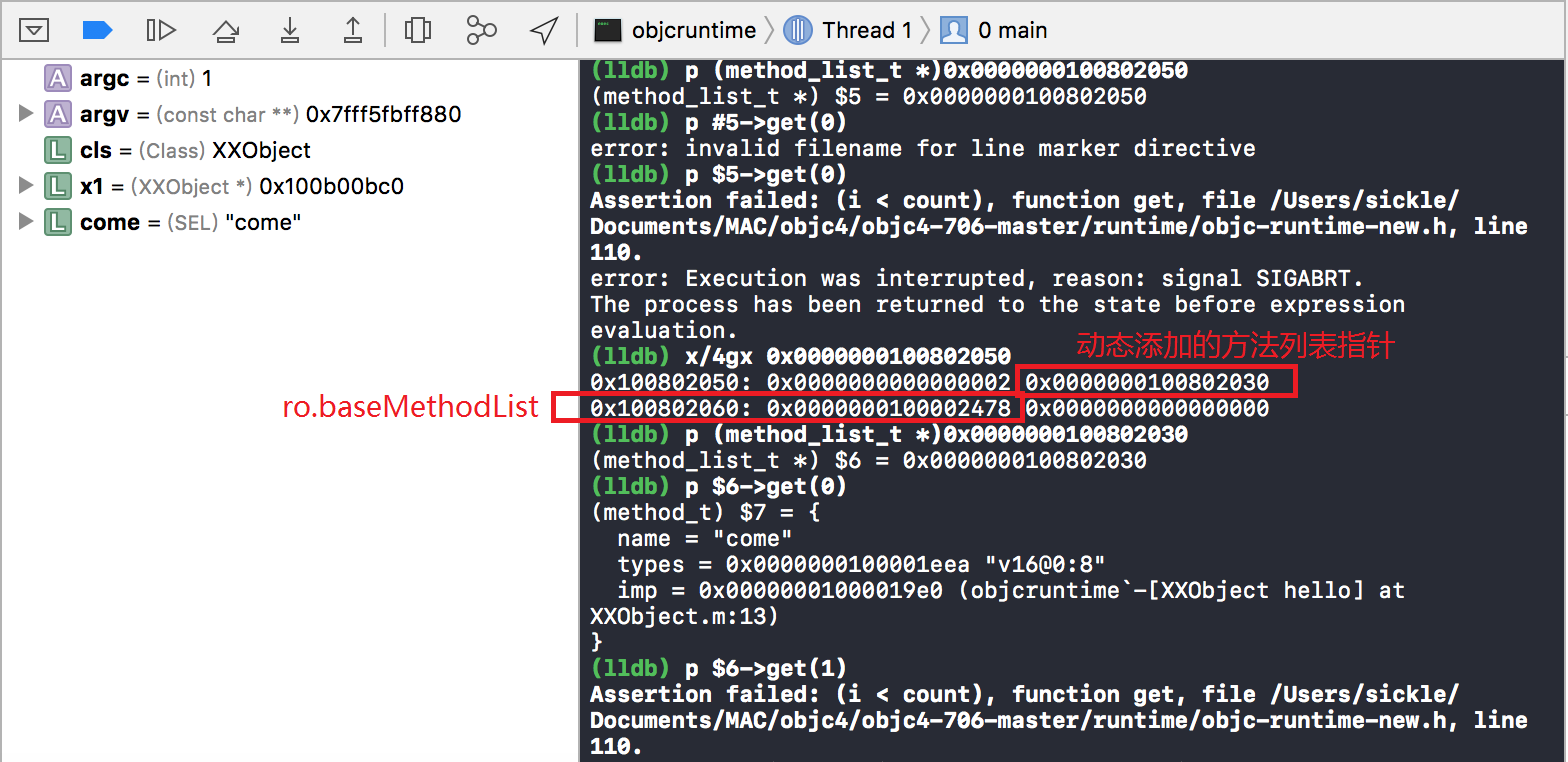
所以,动态添加的方法只修该 rw 中 methods 的内存布局,对编译期间就确定的 ro 中的 baseMethodList 没有影响。 ro 的结构是在编译期确定的,在运行期间不可更改


Reference

[1] 深入解析 ObjC 中方法的结构 http://draveness.me/method-struct.html
[2] 从 NSObject 的初始化了解 isa http://draveness.me/isa.html
[3] 用 isa 承载对象的类信息 http://www.desgard.com/isa/
[4] 我们的对象会经历什么 http://www.jianshu.com/p/ff8a7c458c96

----------------------END END----------------------